H1: Unleashing the Power of 3D Text in Revit: A Comprehensive Guide
H2: Introduction: Embracing the Third Dimension for Textual Enhancements
3D text in Revit, a powerful feature, empowers architects, engineers, and designers to create visually striking and informative text elements within their building models. By transcending the limitations of 2D text, 3D text adds depth, realism, and versatility to Revit projects, enhancing communication and presentation capabilities.


Table of Content
- 1 H1: Unleashing the Power of 3D Text in Revit: A Comprehensive Guide
- 1.1 H2: Introduction: Embracing the Third Dimension for Textual Enhancements
- 1.2 H2: Creating 3D Text in Revit: A Step-by-Step Guide
- 1.3 H2: Creating 3D Text in Revit: A Step-by-Step Guide
- 1.4 H2: Enhancing 3D Text Appearance: Customization and Effects
- 1.5 H2: Positioning and Orientation of 3D Text
- 1.6 H2: Advanced Techniques for 3D Text Manipulation
- 1.7 H2: Conclusion: The Value of 3D Text in Revit
- 1.8 H3: Frequently Asked Questions (FAQs)
H2: Creating 3D Text in Revit: A Step-by-Step Guide
- Activate the "Annotate" tab.
- Select the "Text" tool.
- Click on the desired location in the model.
- Enter the desired text content.
- Adjust text properties (font, size, color, etc.) as needed.

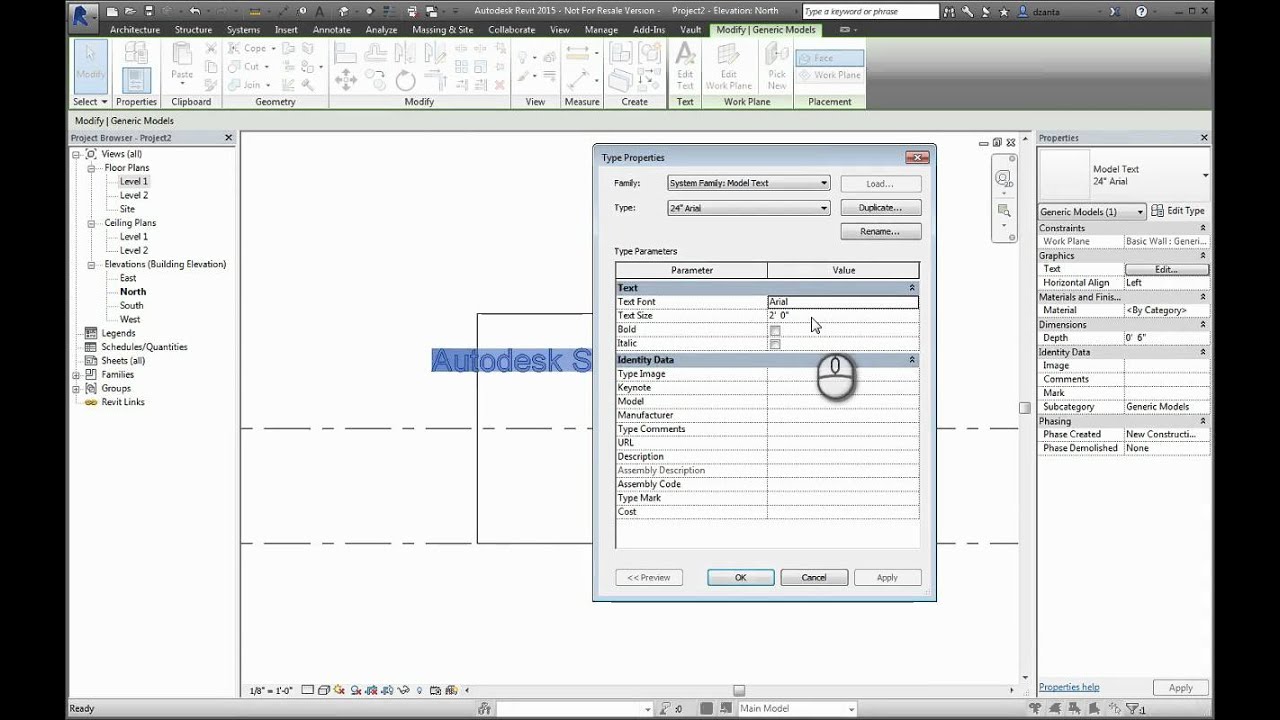
H3: Method 2: Exploiting the Model Text Command
- Activate the "Manage" tab.
- 3d Cnc Laser Cutting Machine 3D CNC Laser Cutting Machine: Precision Cutting For Complex Geometries
- 3d Laser Cutting Machine Manufacturers 3D Laser Cutting Machine Manufacturers: A Comprehensive Guide
- 3d Laser Cut Models Download 3D Laser Cut Models Download: A Comprehensive Guide
- Wedding Invitations 3d Laser Cut Wedding Invitations 3D Laser Cut: A Guide To The Ultimate First Impression
- 3d Laser Cut Logo 3D Laser Cut Logo: Elevate Your Brand With Precision And Impact
- Activate the "Annotate" tab.
- Select the "Text" tool.
- Select the "Model Text" command.
- Click on the desired location in the model.
- Specify the text content and properties in the Model Text dialog box.
- Click "OK" to create the 3D text.
- Extrusion: Adds depth to text by extruding it along a specified direction.
- Bevel: Creates a slanted edge around the text.
- Glow: Adds a luminous aura around the text.
- Shadow: Casts a shadow behind the text.

3D text in Revit, a powerful feature, empowers architects, engineers, and designers to create visually striking and informative text elements within their building models. By transcending the limitations of 2D text, 3D text adds depth, realism, and versatility to Revit projects, enhancing communication and presentation capabilities.
H2: Creating 3D Text in Revit: A Step-by-Step Guide
H3: Method 1: Utilizing the Text Tool

H2: Enhancing 3D Text Appearance: Customization and Effects

H3: Adjusting Text Properties
Revit offers a wide range of properties to customize the appearance of 3D text, including font, size, color, alignment, and justification. These properties can be modified through the Properties palette or the Text Editor.
H3: Applying Text Effects

Beyond basic properties, Revit provides various text effects to enhance visual impact. These effects include:

H2: Positioning and Orientation of 3D Text
H3: Placement Options
3D text can be placed on various surfaces within the model, including walls, floors, ceilings, and model lines. The placement options provide flexibility in positioning text elements precisely.
H3: Rotation and Alignment
Revit allows for precise rotation and alignment of 3D text. Text can be rotated along the X, Y, and Z axes and aligned to various reference planes to ensure optimal visibility and readability.
H2: Advanced Techniques for 3D Text Manipulation
H3: Text on Curved Surfaces
Revit enables the creation of text on curved surfaces, such as curved walls or cylindrical objects. This advanced technique adds a touch of elegance and sophistication to building models.
H3: Text with Linked Parameters
3D text can be linked to Revit parameters, allowing for dynamic updates to text content based on changes to the model. This feature is particularly useful for labels, annotations, and other text elements that require frequent updates.
H2: Conclusion: The Value of 3D Text in Revit
3D text in Revit is an indispensable tool for architects, engineers, and designers who seek to enhance the visual appeal, clarity, and accuracy of their building models. By embracing the third dimension, Revit users can create stunning text elements that effectively communicate design intent, improve presentation quality, and facilitate collaboration.
H3: Frequently Asked Questions (FAQs)
Q: Can 3D text be exported to other formats?
A: Yes, 3D text can be exported to various formats, including DWG, IFC, and OBJ.
Q: Is it possible to create 3D text with custom fonts?
A: Yes, custom fonts can be loaded into Revit and used for 3D text creation.
Q: How can I ensure the readability of 3D text in different views?
A: Revit provides tools to control the visibility and scale of 3D text based on view distance, ensuring readability in various viewports.